How to create different World Objects?
In this section I will describe the process to create different object types.
The concept of “Objects” in Reldens is something quite generic but to put it simply: an object can be anything in the world that would be more interactive than just a simple collision.
You will find from static objects that will just run animations on collision to respawning enemies that will chase you to battle, all these will be Objects in the world, to avoid confusion with programming concepts we can call these World Objects (for reference WO).
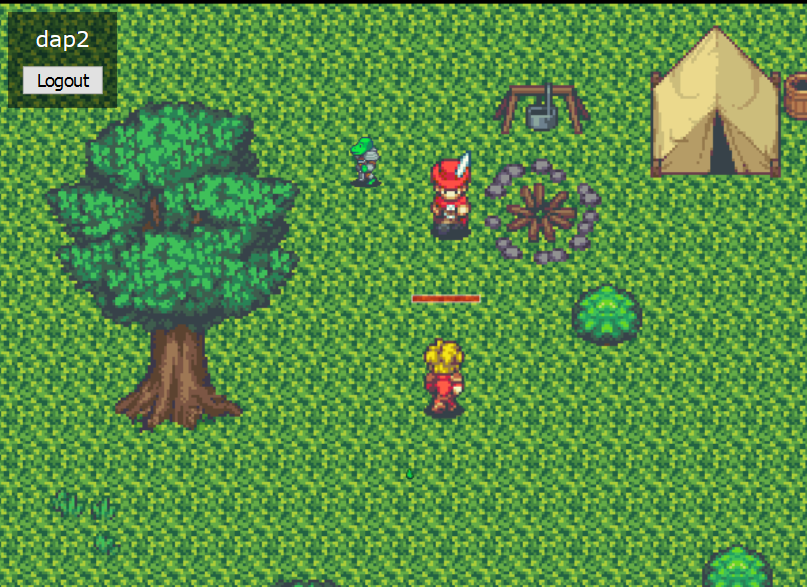
Some examples of these can be seen already in the current demo: the doors that open when you are close are animation objects, the NPCs that will talk to you and give you items, and the enemies in the forest.
In terms of development the main steps for a WO creation are pretty much the same to the ones for the item creation with the exception that the first step is actually for the maps:
1 - Prepare your maps
2 - Get your database ready
3 - Get your objects and classes ready
4 - Get your assets ready
5 - Build your client
6 - Reload / run your Server and be happy!
For this example we are going to create 3 new objects, a simple animation (moving grass when stepped over), a talking NPC and an enemy with respawn.
So let’s go through these…
Note, the skeleton repository master branch doesn’t contain the modifications commented on this doc, to find these changes you can visit the master-docs-examples branch: https://github.com/damian-pastorini/reldens-skeleton/tree/master-docs-examples
1 - Edit your map
For this example I’m going to place all the objects in the same map, so go to the maps folder:
[skeleton-root]/theme/[your-custom-game-theme]/assets/maps
In my case: /theme/custom-game-theme-test/assets/maps
And open the reldens-forest.json map file on the TiledMap editor.
We need to do two things here:
Calculate the tile index for the objects we are going to put in static places.
Create a new respawn layer for the enemies.
In order to do the calculation we need to spot where our objects are going to be (in the future this is going to be easier because the admin will allow you to pick these visually, or even just adding the object key as info on the tiles, but these features will be on a future release), for now, follow these steps:
Roll over the tiles where your objects are going to be placed and you will see some numbers at the bottom of the app:

- These are the X, Y coordinates for your tile position in the map, with these we are going to calculate the tile index number which we need for the database, so take note of each of the positions where your objects are going to be placed.
Do the math for each position: (total cols * row number) + col number
Our tile index for that position is (48 * 10) + 9 = 489 > remember / note this number > here we will position the grass. - Next one (48 * 4) + 10 = 202 > here we will show our new NPC.

Now you have your indexes ready for your objects, the last thing you need to note here is the layer where your objects are going to be displayed, in this case we will use the layer:
objects-collisions-over-player
As you may have noted, so far we only took data from the map but didn’t modify anything so it’s time to do some modifications to include a new respawn layer.
For visual reference, you can hide the other layers to see how the current respawn one is done (basically just using the floor grass to create the area where the enemies can respawn and move).
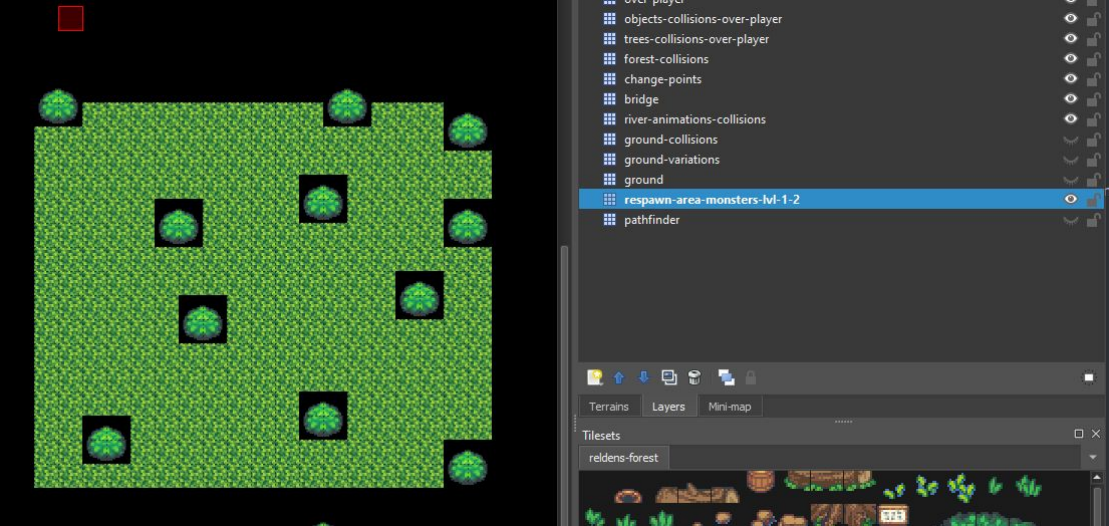
You can just duplicate that and get the contents somewhere else, like:


Once you finish, just save the file, and with that we are ready for the next step.
2 - Preparing the database
There are 3 tables in which we are going to insert information:
- objects: for the entities itself.
- objects_assets: for the assets related to each entity.
- respawn: to relate the objects with a particular map layer and save the respawn information.
So first go to your database and insert the following records in the “objects” table:
INSERT INTO `objects` (`id`, `room_id`, `layer_name`, `tile_index`, `object_class_key`, `client_key`, `title`, `private_params`, `client_params`, `enabled`) VALUES (13, 5, 'objects-collisions-over-player', 489, 'grass_1', 'grass_forest_1', NULL, NULL, NULL, 1);
INSERT INTO `objects` (`id`, `room_id`, `layer_name`, `tile_index`, `object_class_key`, `client_key`, `title`, `private_params`, `client_params`, `enabled`) VALUES (14, 5, 'objects-collisions-over-player', 202, 'npc_5', 'npc_forest', 'Talker', NULL, NULL, 1);

INSERT INTO `objects` (`id`, `room_id`, `layer_name`, `tile_index`, `object_class_key`, `client_key`, `title`, `private_params`, `client_params`, `enabled`) VALUES (15, 5, 'respawn-area-monsters-lvl-3', NULL, 'enemy_3', 'enemy_forest_3', NULL, NULL, NULL, 1);
The first thing you can note about these inserts is that we are using the layer_name and the tile_index we took as reference before.
In addition we need to specify the “room_id” = 5 which is the forest room.
The “class_key” is going to be used as the Object.key and the “object_class_key” is a reference to the index key used in the objects custom classes configuration, the path is: server/customClasses/objects/[object_class_key].
The last insert is specifically for the respawn area so we only need to specify the layer and not a single tile index.
The next inserts are the ones for the assets:
INSERT INTO `objects_assets` (`object_asset_id`, `object_id`, `asset_type`, `asset_key`, `file_1`, `file_2`, `extra_params`) VALUES (11, 13, 'spritesheet', 'grass_forest_1', 'grass', NULL, '{"frameWidth":64,"frameHeight":64}');

INSERT INTO `objects_assets` (`object_asset_id`, `object_id`, `asset_type`, `asset_key`, `file_1`, `file_2`, `extra_params`) VALUES (12, 14, 'spritesheet', 'npc_forest', 'people-e-x2', NULL, '{"frameWidth":52,"frameHeight":71}');

INSERT INTO `objects_assets` (`object_asset_id`, `object_id`, `asset_type`, `asset_key`, `file_1`, `file_2`, `extra_params`) VALUES (13, 15, 'spritesheet', 'enemy_forest_3', 'monster-lizardman1', NULL, '{"frameWidth":47,"frameHeight":50}');
Remember to replace the hardcoded IDs in these queries by proper values in your database.
Note that each respawn area belongs to a single object (though you can later configure the area to create multiple instances of it), so you still need to specify the sprite for that object.
The last entry we need to add is the one for the respawn area configuration (in the respawn table):
INSERT INTO `respawn` (`id`, `object_id`, `respawn_time`, `instances_limit`, `layer`) VALUES (5, 15, 5000, 1, 'respawn-area-monsters-lvl-3');
3 - Get your objects and classes ready
All the required classes for these examples are going to be created on the server side, and those will push the information to the client.
Go to the folder:
[skeleton-root]/theme/packages/objects/server
Inside we are going to create the new files.
// grass.js

const { AnimationObject } = require('reldens/packages/objects/server/animation-object');

class Grass extends AnimationObject
{

 constructor(props)
 {
 super(props);
 this.runOnHit = true;
 this.roomVisible = true;
 Object.assign(this.clientParams, {
 enabled: true,
 frameStart: 3,
 frameEnd: 4,
 repeat: 4,
 hideOnComplete: false,
 autoStart: false,
 restartTime: 2000
 });
 }

}

module.exports.Grass = Grass;
As you can see we are setting the execution to be done when the object is hit (in this case the collision with the player), and everything else is just animation data (this is available from the server since this way in future versions of the platform we will create new entities to make these configurable without need this classes).
Also note this extends from the AnimationObject which has specific methods to execute these configurations.
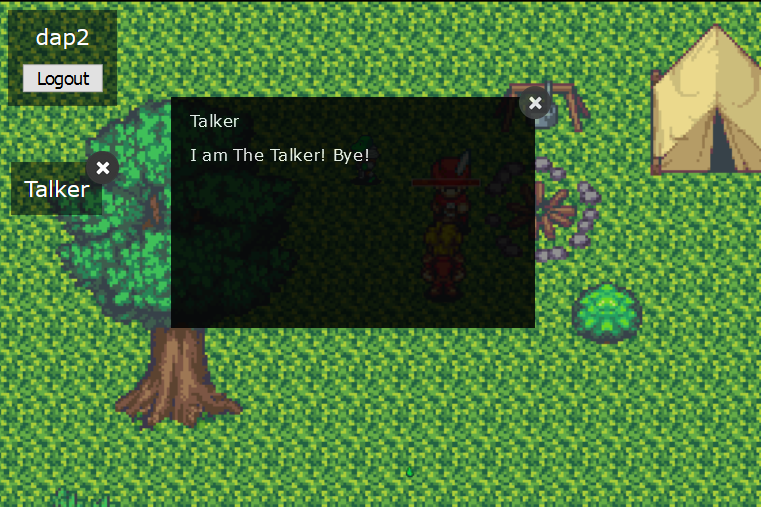
For the NPC the class is even more simple:
// talker.js

const { NpcObject } = require('reldens/packages/objects/server/npc-object');

class Talker extends NpcObject
{

 constructor(props)
 {
 super(props);
 this.runOnAction = true;
 this.playerVisible = true;
 this.clientParams.enabled = true;
 this.clientParams.ui = true;
 this.content = 'I am The Talker! Bye!';
 }

}

module.exports.Talker = Talker;
Note: you could use the database client_params to get the message.
Then for the respawn areas we could use one or two classes depending on your goal.
The first required class is one for the respawn area itself.
// enemy3.js

const { EnemyObject } = require('reldens/packages/objects/server/enemy-object');
const { MultipleObject } = require('reldens/packages/objects/server/multiple');

class Enemy3 extends MultipleObject
{

 constructor(props)
 {
 super(props);
 this.classInstance = EnemyObject;
 this.respawn = true;
 }

}

module.exports.Enemy3 = Enemy3;
The second and optional is the EnemyObject: if you create your own and define it here, you can add any custom behaviors on it. An example of this is the current enemy1-object which has an event listener for the battle end to drop an item.
The last thing we need to do is setup these classes in the file:
[skeleton-root]/theme/packages/server.js
const { Grass } = require('./objects/server/grass');
const { Talker } = require('./objects/server/talker');
const { Enemy3 } = require('./objects/server/enemy3');

module.exports.CustomClasses = {
 objects: {
 grass_1: Grass,
 npc_5: Talker,
 enemy_3: Enemy3,
The only requirement here is to use the object_class_key specified in the database.
3 - Objects assets
You can get these sample files from:
In your project you need to place these:
[skeleton-root]/theme/[your-theme-folder]/assets/custom/sprites/grass.png
[skeleton-root]/theme/[your-theme-folder]/assets/custom/sprites/monster-lizardman1.png
[skeleton-root]/theme/[your-theme-folder]/assets/custom/sprites/people-e-x2.png
4 - Build your client
As you may / should know everything related to the client side of the project must be builded in order to make it work. By default Reldens comes with Parcel to run these builds.
The Skeleton package provides some commands to re-run the build after you customize the project.
The first you need to run is the “[your-OS-prefix]BuildClient” command (replacing [your-OS-prefix] by “windows” or “linux”, and adding --them=[your-theme-folder] as parameter, in my case all this translates to:
$ npm run windowsBuildClient --theme=custom-game-theme-test
Your output will look like this:

After that and since we included new images we need to copy those as well, for that we need to use the command “[your-OS-prefix]CopyCustomAssets” and pass the theme name as well, like:
$ npm run windowsCopyCustomAssets --theme=custom-game-theme-test
5 - Start your server and be happy!
$ npm start